

You are here, It means you are facing problems with your windows. A Windows feature is used to solve and diagnose that problem. Known as Safe Mode Windows 10 Networking. You will have limited features and don’t access to heavy applications. In safe mode, limited features are provided with limited drivers and applications support.Get your Windows 10. And for Windows 10 Product key the articles below:
Windows 10 Pro Product Key
Windows 10 Activator Key
Safe Mode Windows 10 Networking:
Things to do in Safe Mode Windows 10 Networking
- It only Loads Important Files
- Don’t Load Unnecessary Drivers
- Used to Scan Malware in Windows
- Install/ Uninstall Drivers
- Download necessary tools
- Antivirus You Need To Remove Malware
Below are some methods discussed How To Enable Safe Mode Windows 10 Networking. We have tried our best explain each and every step. If you find it difficult please do let us know.
See More:Run Windows 10 in Safe Mode
What are the Limitations of Safe Mode Windows 10 Networking?
There are a minimum set of drives in Windows 10 safe mode. Moreover, you can access the all the services. You can fix the problem in a safe way just and can’t use many features.
Difference between Simple Safe Mode and Safe Mode Windows 10 Networking?
Both are quite similar but have little difference that there are more services you have in safe mode with networking. In Windows 10 safe mode, you can not access the Internet and don’t have network drivers. On the other hand, Windows 10 safe mode with networking have internet access you can use the Internet and have network drivers.
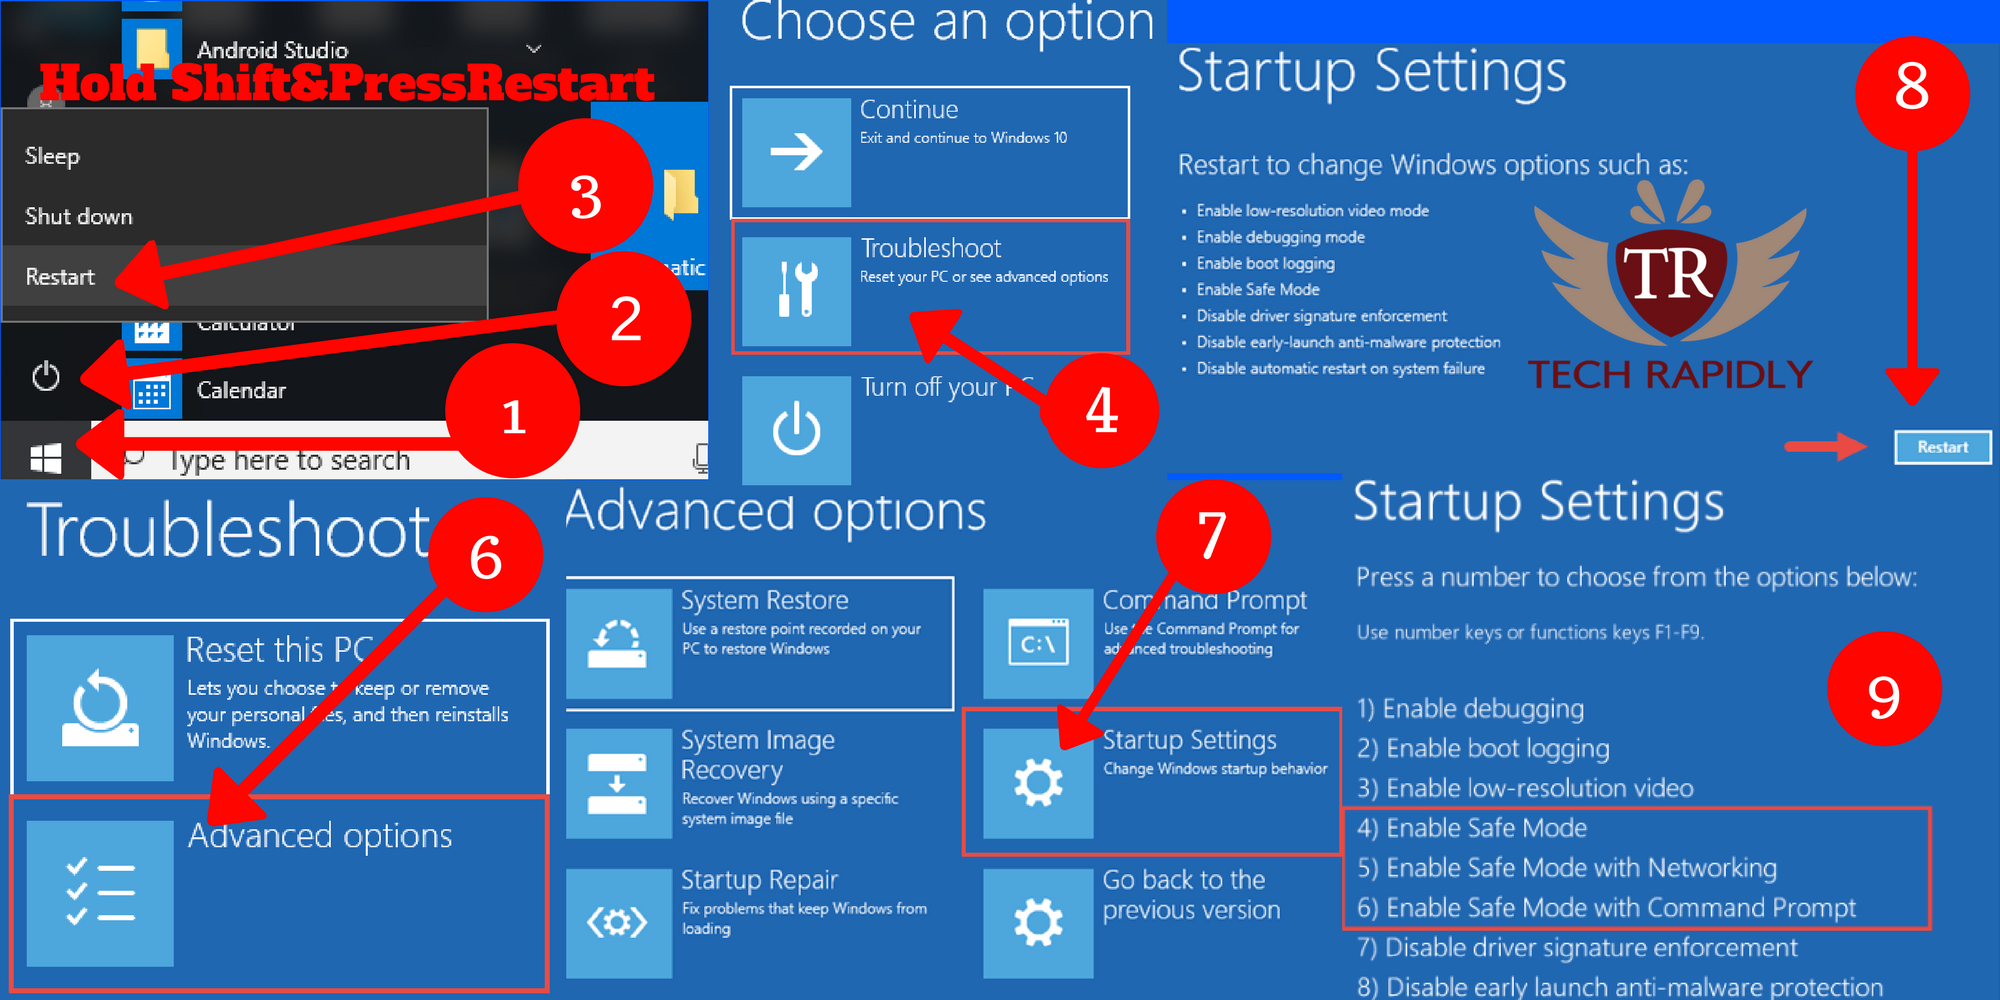
1=> Shift & Restart:
- Open Start menu in the left corner
- Now Click Power Button
- Keeping the Shift Key Pressed, Click Restart Button
- Now Windows Will ask You 3 Options (Continue, TroubleShoot, Turn off PC )
- Select Troubleshoot(Restart your pc or see advanced options)
- After That Select Advanced Options
- Now Choose Startup Settings
- Windows will ask you to Restart. Do it
- Now you will see options
- a.Enable Safe Mode
- b.Enable Safe Mode Windows 10 Networking
- c.Enable Safe Mode Command Prompt
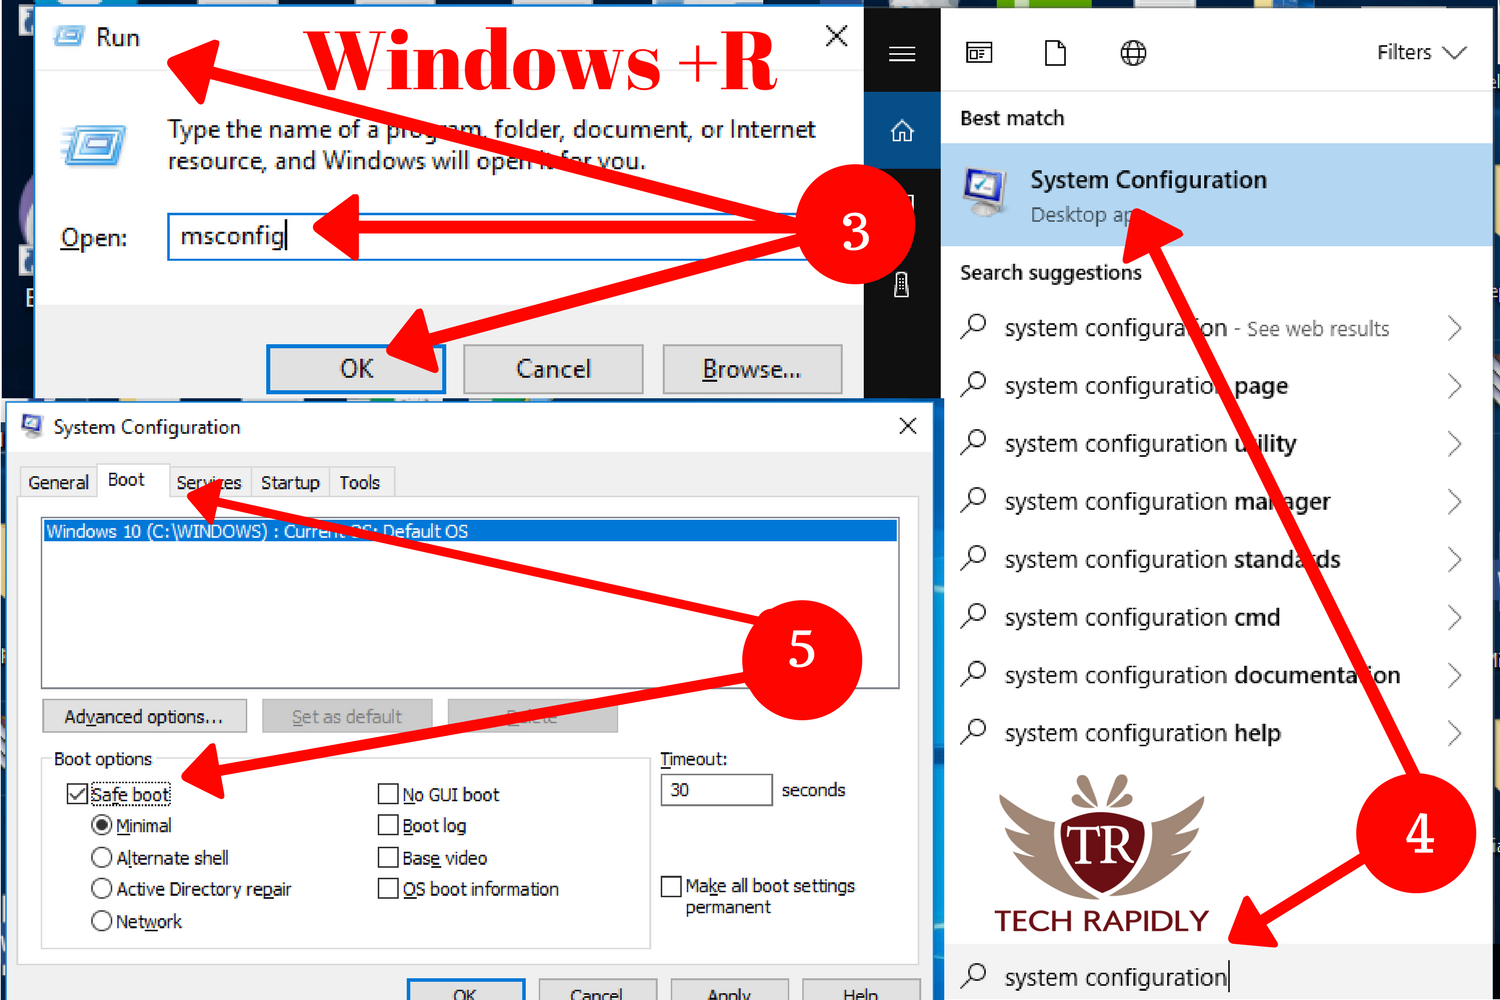
2=>Using System Configuration Tool:
- System configuration tool is also popular as msconifg.exe.
- To Open msconfig.exe.
- Launch Run (Press Windows +R) from Keyboard.
- You can also use search System Configuration in the left corner of windows 10.
- In System Configuration Windows. Move to Boot tab
- Now select Safe boot option and click ok.
- Windows will ask to restart your Windows 10
- After reboot, you are in Safe Mode Windows 10 Networking
3=>Using Setting App:
You can also access Safe Mode Windows 10 Networking by using Setting app. The procedure is discussed below n steps.
- Open Settings (Use”Windows + I” )
- Move on to Update and Security Section
- On the left side, you will see recovery option click on Recovery
- The right side in Advanced Startup Section Click on Restart Now
- Now Windows Will ask You 3 Options (Continue, TroubleShoot, Turn off PC )
- Select Troubleshoot(Restart your pc or see advanced options)
- After That Select Advanced Options
- Now Choose Startup Settings
- Windows will ask you to Restart. Do it
- Now you will see options
- Choose Safe Mode Windows 10 Networking
4=>Booting From a Recovery Drive:
You need to make first a USB bootable and then Recovery USB Disk after that follow the steps below.
- Create a USB Recovery Drive
- Use USB to Boot Your Windows 10
- Load all the Contents
- You will be asked to choose keyboard layout
- On Choose an Option Screen
- Select Troubleshoot(Restart your pc or see advanced options)
- After That Select Advanced Options
- Now Choose Startup Settings
- Windows will ask you to Restart. Do it
- Now you will see options
- Select The mode with Safe Mode Windows 10 Networking Writtern
Related: Windows 10 Safe Mode From Boot
5=>Windows 10 Installation + Command Prompt :
Your windows 10 is broken and you want to repair it. You can use Windows 10 safe mode and then command prompt to get your windows 10 back to its original place. But you need to make your USB Bootable Windows.
- Make USB Recoverable and Boot it with Windows 10
- Load all the Contents
- Choose keyboard layout
- Now on next Screen select Repair Your Computer
- Select Troubleshoot
- In Advanced Options choose Command Prompt
- Enter the following in CMD: bcdedit /set {default} safeboot minimal
- You will see: The Operation Completed Successfully
- Close the Command Prompt
- Click Continue on the next Screen
- After that, your pc will restart
- Now you will see Safe Mode Windows 10 Networking enabled
6=>Interrupt Normal Boot Process :
If your Windows 10 fails to enter in safe mode three times failed. It is going into Automatic Repair Mode. Using automatic repair mode you can move on to safe mode.
How to Get into Automatic Repair Mode:
- Interrupt the normal boot process consecutive three times
- You can either use power button
- Or use Reset
- It must be done before loading Windows 10
- Power Button pressed for 4.5 seconds to interrupt the process
- When your pc Enter Automatic Repair mode
- You will see “Preparing Automatic Repair”
Now after Getting into Automatic Repair mode perform the following:
- Wait For Windows 10 for an automatic diagnose of our system
- When you see “Automatic Repair” Screen
- Select Advanced Options
- Select Troubleshoot(Restart your pc or see advanced options)
- After That Select Advanced Options
- Now Choose Startup Settings
- Windows will ask you to Restart. Do it
- Now you will see options
- Select The mode Safe Mode Windows 10 Networking
7=>Get into Safe Mode Windows 10 Networking F8 Using F8 or Shift F8:
With the previous versions of Windows, you can easily boot using F8, but when Microsoft updated to Window 8 and after that to Windows 10.
It can happen only before loading the Windows 10, just press the F8 or Shift F8 key from your keyboard. It will help you to enter into the recovery mode option where you can just enter into the Safe Mode Windows 10 Networking.
When you turn on a Windows 8 PC, there’s never still sufficiently long to distinguish keystrokes like F2 or Shift F8. Also, substantially less time to peruse a message, for example, “Press F2 for Setup.” For the first run for Windows 10 Safe mode through in decades, you will never again have the capacity to interfere with a boot and advise your PC to do anything, not the same as what it was at that point hoping to do.
Conclusion on Safe Mode Windows 10 Networking :
In the above article, we have seen that how to enter Safe Mode Windows 10 Networking. Also, what is the difference between windows safe mode and windows safe mode with networking? Both are similar terms, but with networking, you can use internet facilities in Safe Mode Windows 10 Networking.We have discussed in brief how to get into safe mode windows 10 Networking.
We are always here to help you out. Please Let us know in the comments section what do you think about the article.Suggestions are highly appreciated. If you are still facing any issues or have any other problem, you think we can deal with Please Let us Know !!! Thanks All


