The Internet is the need of everyone today. Without any internet, you will just sit idle. Sometimes your internet or available Wifi shows the error “Can’t Connect to this Network”. Although, your laptop Wi-Fi can’t connect to any Network. There are many reasons behind this problem. For example, When you install new Windows 10 or upgrade to Windows 10 from Windows 7 or 8.
On the other hand, this kind of issue also due to the improper Installation of drivers in Windows 10. Whatever the problem are you facing, the important point here is to fix this problem(Windows 10 Can’t Connect to this Network). There are multiple solutions for this problem. Moreover, we will discuss all the way to connect to the Wi-fi in Windows 10. Before move on, let’s Highlights the possible issues:
Possible Issues of unable to connect with Wi-Fi in Windows 10
Sometimes you get this kind of issue in your Windows 10. One of the users installed the proper drivers in Windows 10. but still facing Windows 10 Can’t Connect to this Network.

Here is the list of more issues for connecting Wi-Fi in Windows 10:
- Drivers are not properly working.
- Expire or unupgraded drivers.
- Wi-Fi adapter is not in working state.
- Wi-Fi Wires are unplugged.
- Network Settings in your PC changed.
As we already told that there are many possible solutions for the problem about Windows 10 Can’t Connect to this Network.
Method-1 to solve Can’t Connect to this Network in Windows 10
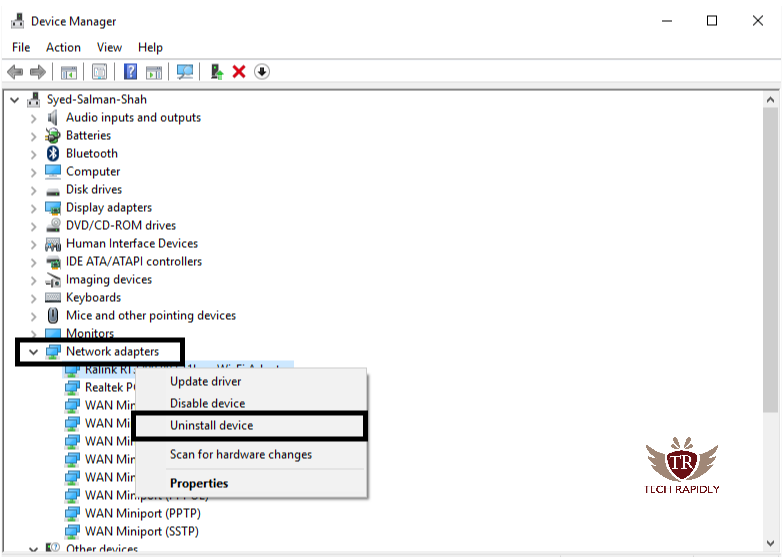
Using Network Adapter: Sometimes when you see an error “Windows 10 Can’t Connect to this Network” may be due to the problems in Network Adapter. Now you need to uninstall the Network Adapter manually. When you uninstall the driver, Windows 10 feature is that it will automatically reinstall the Network adapter driver again. you don’t need to install it again.
- Go to Start > Type “Device Manager”
- Open the Device Manager.
- From the List, expand Network adapters option.
- Right-click on your network adapter and select Uninstall.
- Click Ok.
- Restart or Reboot your Windows 10.
Next time, Windows 10 will automatically install the driver of Network Reboot.

Method-2 Update your Network Adapter driver
Can’t Connect to this Network also due to the outdated and missing errors. If your Windows 10 has installed the Adapter Network driver but it is outdated and you have to install it manually then don’t worry. We have the possible solution of a problem why my windows 10 is not connecting to Wi-Fi.
Download and Install the Driver Easy Software. It is free and pro versions both are available. Run Driver Easy will scan all the possible drivers in your Windows 10. Driver Easy will at that point examine your PC and distinguish any issue drivers.
Method -3 Temporary Turn off the Firewalls
Wi-fi is not connected to Windows 10 may also due to the problems in Firewalls. Firewalls prevent you to connect with specific Network. You can try to turn off the firewalls and go to the trusted URL so that your connected will remain safe. Here is the way to turn off the firewalls easily:
- In the Cortana in Windows 10, Type Command Prompt.
- Right-Click on Command Prompt and click “Run as Administrator”.
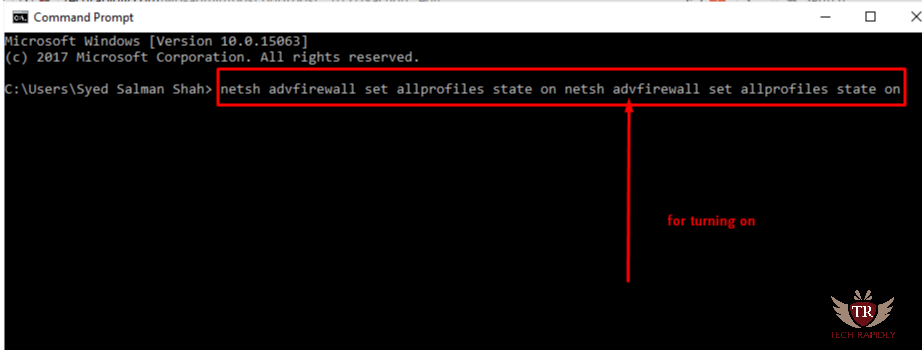
netsh advfirewall set allprofiles state off
- Type the above command in CMD to turn off the firewalls and get a rid of Can’t Connect to this Network in Windows 10.
“netsh advfirewall set allprofiles state on” Type this Command if you want to turn On the Firewalls again.

At last, What is the Conclusion about Wi-fi Connection in Windows 10?
We have discussed all the possible solutions of the problem “Can’t Connect to this Network”. We declared that these types of issues are due to the driver’s issues in Windows 10. As Windows 10 automatic install drivers so it is necessary to update your drivers in Windows 10.
Which method did you use for solving your Windows 10 Wi-fi not connected issue? Have you had any issues still? Which feature of Windows 10 in your system are you missing? Please let us know your Views and suggestion in the comments!


